Verbal Storytelling
with Props
A few ideas to get you started
A few ideas to get you started
By Cheryl Jackson
of
of
Children
love stories – whether reading books, listening to story CD’s or having stories told to them. We as parents and caregivers know that stories feed the imagination
of children and provide strong foundations for children’s own storytelling, as well as rich and varied language development and a love of books. Sharing stories is also great
fun!
A different
approach to stories is making up your own whilst incorporating
characters and props in scenes for your children to watch. This can be really personalized for the children and you can pitch the story just right for their
attention spans, ages and interests. However it can be a bit of a scary
prospect for a novice storyteller! So here are a few ideas to get you started.

Step 1: Setting the Scene
As you'll
see in the photos below, your story can take place anywhere. There should be a
defined stage for the story to be enacted upon and a comfy seating area for the
audience to sit. In the stories above I have used my dining table while the
children sat on the chairs, the sofa and low table with the seating area being
cushions on the floor, outdoors on the patio with waterproof fabric to sit on
and my seasonal table shelf with beanbag seating. It is enough to suggest the
scenery with appropriate colored fabric pieces, natural materials and simple
shelters made from folds of fabric, piles of stones, boxes, building bricks
etc. The children have great fun guessing what the story will be about as they
watch you set the scene.
To populate
your stories you can raid bits from the children’s toy boxes or have a special
set of figures, animals, etc. that are kept just for telling stories with. You
can hand make your own characters and scenic objects – in the stories below I
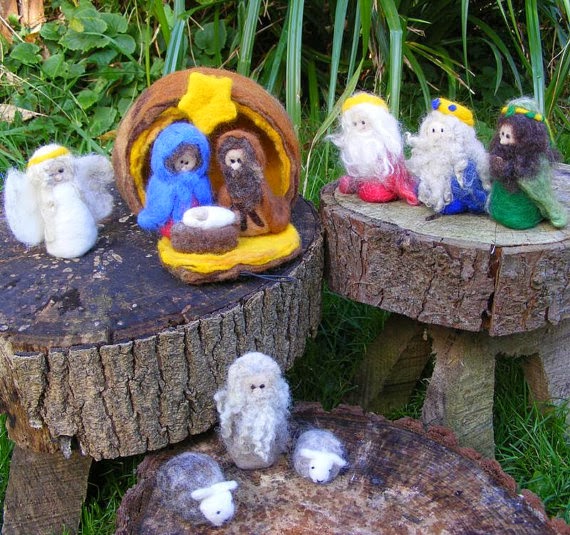
have used felt dolls, needle felted animals and folk, and clay models. Whilst
the children model clay or thread felt necklaces, they like to watch me make
new props and people for the story basket.
Step 2: Telling the Story - Seven Story Ideas to Get You Started:
A
Winter’s Tale
Grandma and Grandpa’s day in the snow, caring for the hungry animals, fetching firewood and making tea.
Grandma and Grandpa’s day in the snow, caring for the hungry animals, fetching firewood and making tea.

How about a
story about a family’s daily activities involving the seasons, festivals and
your children’s own daily activities. The family characters can reflect your
own family make up and include pets and friends. This type of story can be told
daily or weekly and awaken children’s awareness of the cycle of the year and
the rhythm of their home life.
At the Construction Site
A handbrake left off and the empty car rolls over the cliff, how the diggers and trucks work together to move the car and take it to be repaired.
A handbrake left off and the empty car rolls over the cliff, how the diggers and trucks work together to move the car and take it to be repaired.

Children
who enjoy playing with their favorite small world toys love to see them
starring in a story. Seeing new possibilities for ways of using these toys helps children to develop their own narrative threads and enriches their play. Other vehicles, animals, dolls,
houses, soft toys, pirates, knights etc. can be used.
The Spider’s
Web
How the spider tried to trap the bee in his web and how the other insects saved the bee.
How the spider tried to trap the bee in his web and how the other insects saved the bee.

A story can
be educational, building on a child’s interests and adding new factual
knowledge in a fun way. This type of story can broaden and support topics being
learnt at school, perhaps awakening enthusiasm for a subject they find difficult
or tedious. Think water cycle, homes and shelters, counting, mini beasts – take
time to make sure you understand the subject and have your facts right before
you start!
The Lamb
Who Never Listened
Naughty lamb never listened to his parents and kept getting into trouble, rescued by the farmer, owl & fawn.
Naughty lamb never listened to his parents and kept getting into trouble, rescued by the farmer, owl & fawn.

Sometimes
children have difficulty in learning acceptable behavior, often in relation
to others. Stories that reflect the problems they are experiencing and show how
the story characters resolve these difficulties can help a child recognize a new way forward. As well as situations such as sharing and helping others
which can positively affect all children, the story can cover a specific issue such as
fear of thunder or death of a pet. Using a gentle, supportive approach helps children
who may not want to talk directly about their worries.
Jack Frost and The Snowdrop Girls
How Jack Frost covered the garden in glittering snow and how the Snowdrops Girls swept him away to make Spring arrive.

Fairies,
pixies, gnomes, elves, mermaids, witches, wizards – introduce your children to
the magical folk that live in your home and garden, maybe only ever seen by
children. . . Fantasy worlds populated with dragons and unicorns, full of spells,
quests and treasure – add glitter and magic to your children’s imaginations!
Little
Red Riding Hood
All the animals warn her about the wolf, the wolf shuts grandma in the outside loo and pretends to be her by dressing in her hat and apron, wolf tries to catch red riding hood, the animals tell the woodcutter, the wood cutter rescues red riding hood and chases the wolf away
All the animals warn her about the wolf, the wolf shuts grandma in the outside loo and pretends to be her by dressing in her hat and apron, wolf tries to catch red riding hood, the animals tell the woodcutter, the wood cutter rescues red riding hood and chases the wolf away

A good
place to start is retelling a traditional fairy tale. You can use the farm animals,
soft toys, dolls etc to retell a story the children know well. Put your own
twist on it such as changing the Three Billy Goats Gruff to being about a sheep, a
cow and a horse if you don’t have three different sized goat figures. Or maybe the three bears don’t eat porridge but muesli, toast and yoghurt? In your story,
Cinderella could have two grumpy brothers and go to the ball in a limo. Allow
your children to see other ways to tell a story and that it is good fun to
embellish and enlarge on a basic theme.
Step 3: Letting The Children Join In
After the
story is finished and you have said ‘The End’, it's the children’s turn. How
you do this depends on your children’s age and development, but these are
the steps I use as the children grow.
1. Retell the story and let the children
move the characters around the scene.
2. The
children retell the story as they move the characters. At first they just retell
key phrases and the bits of the story that interested them the most or the
ending which is freshest in their mind, but soon they will remember more of it.
3.
The children
will begin to add on their own bits to your story or take the characters in a
different direction – it can help if you provide extra props and characters
next to the scene so they have fresh ideas to hand.
4.
Don’t
forget to role model good audience behavior! Sit still and watch, listen
carefully, clap and say thank you at the end of the story. Enjoy your children’s storytelling and
discover the events and activities in your lives together that they recall and
incorporate into their tales. This can be very surprising!
So gather round, sit yourselves down comfortably and enjoy the
story. . .
Special thanks to Cheryl of Waldorf on Etsy shop SoftnWoolly for her wonderful article on storytelling!